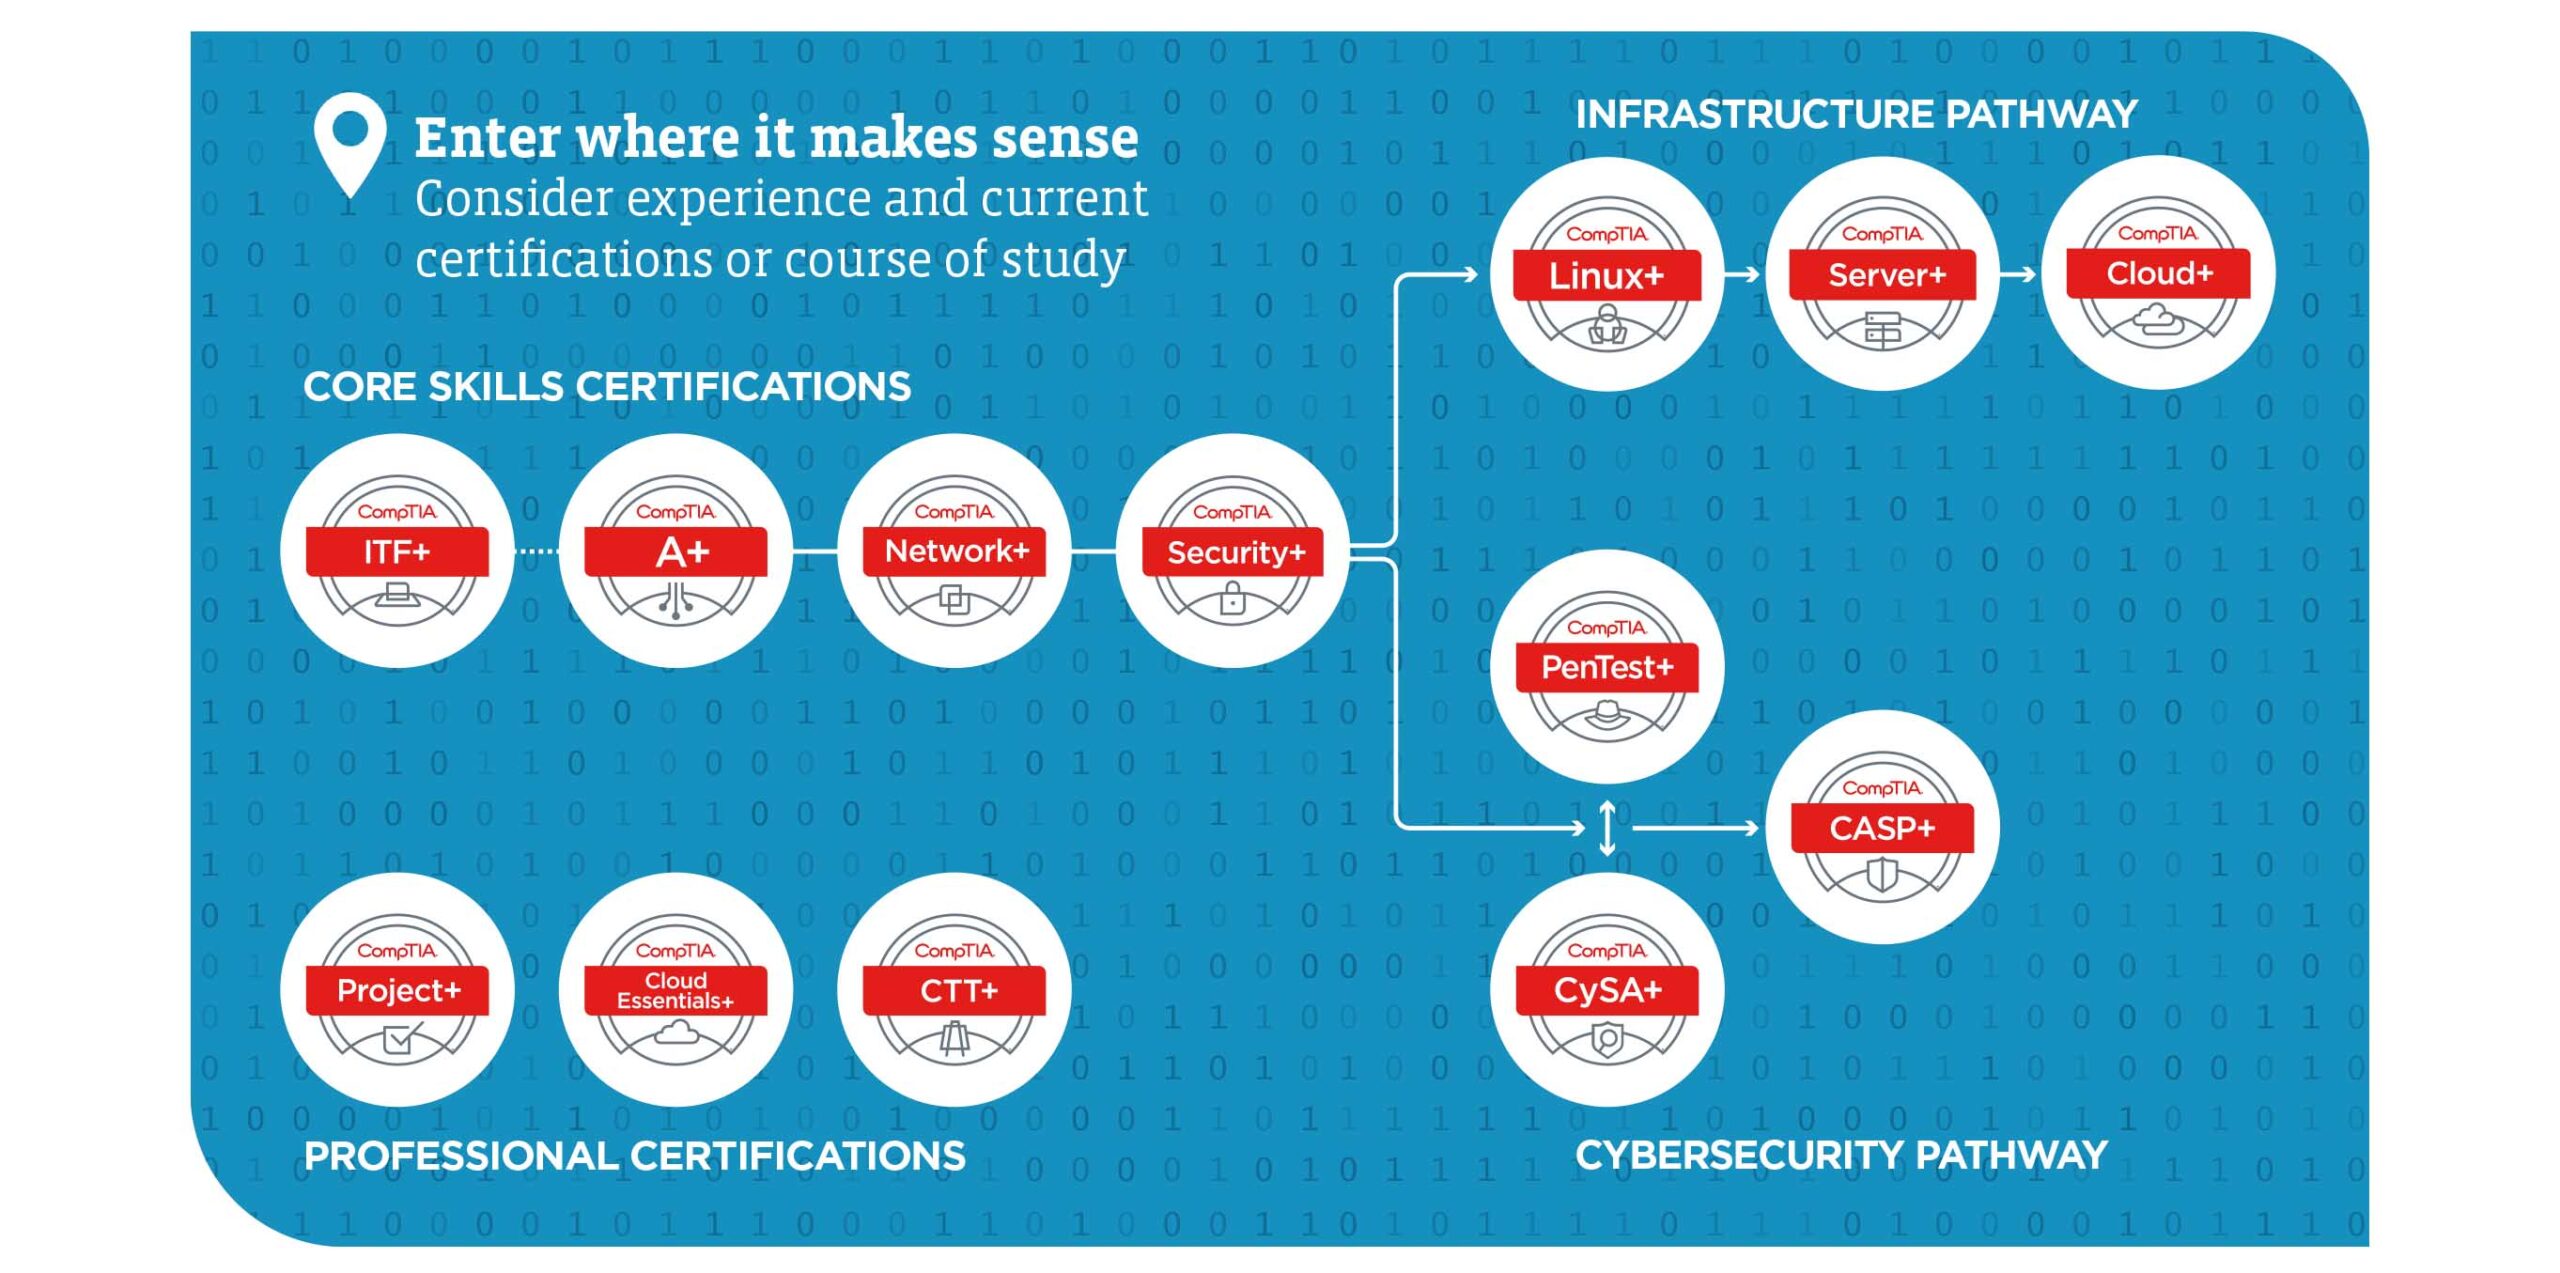
Midjourney Review: Pros, Cons and Features

Midjourney

Introduction The growth of Artificial Intelligence (AI) has increased greatly in a few past years, changing different industries and redesigning the way of increasing technology. One of the greatest tools among all AI tools is termed as Midjourney.  Midjourney provides many opportunities for videographers, designers and content creators in the matter of creative approach to generate professional quality visuals. Following article is the details of Midjourney, its working, benefits and challenges. What is Midjourney Midjourney is an AI tool that is specifically created to generate high quality images from texts by using its special features. This tool makes the best use of multiple machine programs to analyze text and generate images according to a particular text. No matter if it is a design or a portrait, Midjourney has a capability to convert the text into attractive images according to the requirement. The old design tools required technical expertise and experience to create images. But Midjourney is such a tool that does not require much human effort to do so. It allows users to transform text into images simply by describing their desire. This quality makes this an innovative tool for professional videographers, editors, and designers. Download Midjourney Here Evaluate Working of Midjourney Following are the steps of working of Midjourney: Main Aspects of Midjourney Following are some important aspects of Midjourney: Applications of Midjourney Here are some applications of Midjourney: Advantages of Midjourney Some advantages of Midjourney are here: Challenges in Using Midjourney Some challenges in using Midjourney might cause problems. These are following: Future of Midjourney Following are the future possibilities of Midjourney: Conclusion Midjourney keeps a great importance in the light of technology. This tool makes the best use of artificial intelligence to let people create new designs and images according to their needs. Although some challenges occur while using it, its benefits are much more than the challenges. This makes it the best AI tool for image and design creation as it proves itself the best helper for designers. In the near future, Midjourney will play more important roles in terms of designing and creativity. No matter if you are an image creator, designer or an individual trying to know about the power of AI, Midjourney is best suited for you. The features of this tool will keep on increasing over a period of time. Frequently Asked Questions(FAQ’s) 1.     Describe Midjourney? Midjourney is an artificial intelligence tool that generates professional-quality images according to the text description provided by the users. The images created by it look completely natural as it uses the latest techniques to transform text into images. 2.     How can we use Midjourney? Using Midjourney is a simple process. You enter a text and describe the image you want. This tool then creates the image based on the text you provided. You can also make changes in the image. 3.     Can we use Midjourney for free? Midjourney provides both paid and free trials. Free plans offer access to limited features while paid plans provide access to more advanced AI tools, professional-quality images and editing options. 4.     Can we use Midjourney for industrial purposes? Yes, it can be used for industrial purposes based on the specific requirement of the industry. It is particularly designed to create high-quality visuals so businesses in different countries are utilizing its capabilities for creativity. 5.     Which type of images can be created by  Midjourney? Midjourney can create different types of images, including modern designs, paintings, dreamlike environments and many more. The type of image depends on the text description. Related Articles 1: AI Powered Audio Studio – Wondercraft 2: Vidnoz Unleashed: Revolutionizing Interactive Video Creation 3: Create Stunning Gamer Avatar With Midjourney Prompt 4: Invideo AI Video Generator: Create Stunning Videos Fast 5: CorelDRAW Software Reviews, Pros and Cons

Complete Guide to Laptop Screens: Types, Features, and Maintenance

Some of the most integral factors in any experience while using a laptop actually relate to the screen: how it impacts your productivity, entertainment, and usability. A laptop screen will determine if you do your work effectively, enjoy media, or have access to communication with others. Understanding the different types of laptop screens and their features, issues, and maintenance is integral for anyone looking to get the best from their device. The guide shall cover everything one needs to know about laptop screens.  read more about folmoria Types of Laptop Screens 1. LCD (Liquid Crystal Display) LCD screens are the most popular laptop screens used these days. They use liquid crystals placed between two sheets of glass or plastic. The crystals align themselves based on electric currents flowing through them that permit some lights to pass through, with the help of which images are created. Owing to these benefits, LCD screens are the norm now in laptops; they strike a perfect balance between cost, weight, and performance. Benefits: Affordable: LCD screens are relatively cheaper than any new technology, hence within reach of budget-conscious buyers. Lightweight and Thin Design: The thin profile of LCDs contributes to the overall portability of laptops. Power Efficiency: LCDs use less power than the older display technologies, and this helps lead to better battery life. Cons: Limited Viewing Angles: The image quality degrades when viewed from extreme angles, and thus becomes problematic for more than one viewer. Poorer Contrast Ratios: LCDs generally lag behind when it comes to deeper blacks and more vibrant colors compared to more mature technologies. 2. LED LED is an LCD that uses LED as a backlight instead of old fluorescent kind. This technology helps add greater brightness, better color, and efficiency improvements. These, then, add to the popularity of LEDs amongst the newer laptops. Benefits: Brighter Brightness: LEDs can create brighter backlighting, which is preferred for brighter rooms. Better Contrast Ratio: LEDs display deeper black and accurate colors compared with normal LCDs. Thin and Lighter Design: LEDs assisted in making the today’s laptops slimmer. Cons Higher Price: LEDs are more costlier compared to normal LCDs, which will be a disadvantage for budget users. 3. IPS (In-Plane Switching) IP stands for In Plane. In-plane switching is a type of thin film transistor liquid crystal display. It had its first release in 1996. It prevents shine and glow by controlling the placement of its liquid crystals. It is developed to improve upon TN panels, offering improved viewing angles. IPS is among the best LCD monitors, offering high quality color reproduction as well as wider viewing angles. It is thus recommended for applications requiring actual color representation, for example in graphic designing, photography, and video editing. Advantages Excellent Color Quality: Their wide color gamut makes IPS panels ideal for professional use. Wide View Angles: The screen can be viewed from a number of angles without much color or contrast loss. For Group Work: There is an advantage in the wide view angles of this display for several users to be able to see the display at the same time. Cons More Costly: IPS panels are more expensive than a TN panel, and therefore, only possible for users who are not sensitive to cost. More Demanding Gaming Performance: IPS panels are generally considered to have slower response times than TN panel types, which can factor into gaming. 4. OLED (Organic Light Emitting Diode) OLED panels are those types that some might say are the future of display technology. Since each pixel is responsible for emitting its own light, an OLED panel will deliver deeper blacks and a wider range of colours, thereby offering a more true-to-life colour gamut. OLED panels are finding their way into the high-end notebooks, and they appear to produce a very vibrant display. Advantages: Superb Color Contrast: OLEDs may be fabricated to yield contrast ratios extremely high; this will make the viewing experience even more tremendous. True Blacks: The OLED pixels can be fully shut off for blacks so that the black levels are actually true blacks. This also makes OLEDs perfect for movie watching and heavy gamers. Flexible Design Options: In the nature of OLED technology, its capability to give thinner and more flexible screens opens up new possibilities with regard to the design of laptops. More Expensive: OLED panels are more expensive than LCD and LED panels. Chances of Burn-In: Frozen images create burn-in, wherein ghost images persist on the screen and have implications for long-term use 5. Touchscreen Screens Touchscreen laptops combine touch-sensitive technology with a traditional screen. Users can touch or swipe anywhere on the screen, making it more user-friendly. Advantages: Intuitive User Interaction: Touchscreens can be more interactive and more engaging with users. Higher Productivity: The touch functionality might accelerate the speed of navigation and task completion especially in creative work. Good for Creative Applications: Touchscreens are suitable for artists and designers since direct manipulation of the artwork improves productivity. Cons: Reflective Surfaces: Touchscreens tend to feature reflective surfaces that hinder visibility in bright environments. More Weight: Touchscreen versions might add some weight to the product due to extra parts inside. Laptop Screens 1. Resolution Resolution refers to the number of pixels on the screen, so the higher it goes, the clearer the image will be. Most of the common resolutions are: HD (1280 x 720): Standard quality, just the same with the usual stuffs you’ll do with your laptop like browsing and maybe making some words. Full HD (1920 x 1080): Suitable for most laptops, a good balance between clarity and performance. Suitable for multimedia consumption. 2K (2560 x 1440): Offers more detail than the first two and is good enough for graphic design and games 4K (3840 x 2160): Offers incredible detail, suitable for gaming and professional work, but could end the battery life quite quickly. 2. Aspect Ratio The aspect ratio is defined as the relation of the screen in terms of width-to-height. Most common are: 16:9: standard for movies and most laptops

Maximize Your Profits: How to Sell Your Old Laptop

Do you want to sell your old laptop? Maybe it sits in a drawer collecting dust, or you are perhaps due for a laptop update. Selling your laptop can save you money-it’s that simple. This step-by-step guide will walk you through selling your old laptop quickly and efficiently, maximizing your profit and minimizing headaches. read more about folmoria Why Sell Your Old Laptop? Financial Benefits Money is yet another very good reason for selling old laptops. Depending on the condition, age, and specifications of the laptop, you could raise considerable money from it. Even the older versions of the laptops could be sold for a good amount if they are in good condition. This money may help you get the subsequent laptops or even pay for some other personal expenses. Impact on the Environment While the old laptop is being sold so money can be made, such a move will also mean being responsible to the environment. Electronic waste is on the rise, and every single laptop that avoids the landfill and gets reused helps alleviate that problem. It promotes recycling, thereby saving the earth by selling an old laptop. Easy Upgrade A good point to selling your old laptop is that this can be used as an upgrade for purchasing a new one. It will offset the cost of a new device. In addition, upgrading can improve your computing experience. Now you can benefit from the latest technology. Preparation for Selling Your Laptop Save Your Data Before you sell, make sure that you back up all your valuable data. Save all file types, photos, and documents into an external hard drive or even cloud service. Be sure not to lose important information, which you may need one day in the future. Reset Hard Drive Make sure your privacy is complete by completely wiping out your hard drive. You must utilize secure software packages known to wipe out data and render it impossible to access. This will prevent theft of your identity and the ability of others to access your personal information. Clean Your Laptop A clean laptop is more attractive to buyers. This may take in time and effort, but ensure your laptop is cleaned in and out. Remove dust from the vents and keyboards; use a soft cloth for polishing the screen. A well-kept laptop can boost resale value astronomically. Check for Accessories Collect all your laptop’s original accessories, including the charger or other included chargers, manuals, and carrying case. Offer all of these with your sale to increase the appeal and value. Calculating Your Laptop’s Worth Research Other Models You should also compare similar models to set a fair price for your laptop. Good places to look include eBay, Amazon, and Craigslist. See how well established similar laptops in current condition with similar specs sell at what price. Consider the Age and Condition The age and condition of your laptop will have a great impact upon its price. Typically, new or newish models in good condition are going to bring the most money. Do not forget: wear and tear – scratches, or reduced performance capabilities, all play a role in pricing. Evaluate Specifications Good quality specifications will increase the value of your laptop. The most important specs include: Processor Speed: The faster the processor, the higher the demand. RAM: Generally, the more RAM a laptop has, the better it will perform. Storage Capacity: SSDs can replace HDDs more effectively in terms of speed. Laptop Specifications List: It uses these specifications while selling a laptop. Where to Sell Your Old Laptop Online Marketplaces The online marketplaces through which one can sell an old laptop include eBay, Craigslist, and Facebook Marketplace. These platforms allow one to reach a vast number of people that increases the probability of getting a quick sale. eBay eBay is a great marketplace. You can price whatever you want, or auction your laptop and sell it for whatever the market will bear. Craigslist On Craigslist, you can sell locally, so there is no shipping concerns. That means you will probably have to meet with buyers in public places for safety’s sake. Facebook Marketplace With Facebook Marketplace, it is easy enough to post up your laptop. Additionally, you get the benefit of allowing word to spread to friends. Many retailers, including Best Buy and Amazon, offer trade-in programs. Through these programs, you can trade your old laptop for store credit or cash. If you are apt to replace your laptop soon, you’ll want to take advantage of these programs in order to make things go more smoothly. Best Buy Best Buy’s process for trading in a laptop is relatively straightforward. Go online to estimate the amount of value you can expect and then receive store credit toward a new purchase. Amazon Trade-in You can trade in your old laptop at Amazon by sending it their way in exchange for gift cards. It’s a pretty painless way to recycle and get a new product. Local Electronics Stores Check with your local electronics stores – some take used laptops directly or allow for consignment sales. This is a rather low-risk event that allows you to stay off the crowded online marketplaces, hopefully in exchange for a hassle-free transaction. How to Sell Your Used Laptop Successfully Write detailed listing Describe your laptop when you are selling. Provide detailed information such as these:  Specs Processor RAM storage and any upgrades upgr Under conditions. State the scratches, and or problems that the laptop has. Accessories Mention accessories in the sale which will be included. Transparency pays off the motive for the buyer to purchase the laptop  Get Quality Photos Good quality photos may make a real difference for your sale. Let there be good lighting, too, and take shots from different angles: exterior and interior. Emphasize flaws or highlights that can help manage buyer expectations. Be Responsive and Professional Be prompt and professional with the calls; answer whatever questions are asked, and willingly converse to negotiate. The good interaction may let

Mobile Application 

The way we utilize innovation has advanced as portable applications have advanced. Versatile applications have ended up an fundamentally portion of our every day lives, counting everything from efficiency and wellbeing to social organizing and amusement. This article takes an in-depth see at the field of versatile applications, analyzing its advancement, qualities, challenges, and future prospects. read more about folmoria What is portable application development? The prepare of making computer program for smartphones, tablets, and computerized colleagues, particularly for Android and iOS working frameworks, is called portable app development. Applications can be downloaded from the portable app store, utilized through a versatile web browser, or introduced on a gadget. This sort of program advancement employments Java, Quick, C#, and HTML5 as programming and markup languages. The advancement of portable applications is quickening. Organizations in all divisions of the economy, from retail, broadcast communications, and e-commerce to protections, healthcare, and government, must meet client desires for speed and ease of get to. to data and exchanges. read more Benefits of portable application development Convenience Mobile apps permit clients to access data and perform assignments on the go. Engagement apps can give personalized encounters to clients through in-app informing, thrust alarms, and customized content. Accessibility Applications can be utilized and work offline without a web association, making them solid in distinctive situations. Efficiency Apps can increase efficiency and rearrange forms by robotizing assignments and giving speedy access to instruments and resources. Choose a platform Android app advancement is a well known choice among free app improvement companies. What is the reason? The Google Play Store is less prohibitive than Apple’s App Store, with Android supporting 70% of smartphones. However, since iOS gadgets must bolster less gadgets, optimization is simpler. Furthermore, iOS apps have higher client maintenance rates. You may need to consider other variables, depending on the utilize case and target advertise of the portable app you’re building. For illustration, if you are making an app for your company’s representatives, make a cross-platform app that runs on both Android and iOS. You ought to bolster the stages they use. If you are building a portable app for clients and you know that most of your clients utilize iPhones, creating an iOS app ought to be a priority. Increase proficiency and move forward security by coordination advancement stages and gadget administration tools Future patterns in portable applications Machine learning (ML) and fake insights (AI) Combine machine learning (ML) and fake insights (AI) to progress execution, prescient analytics, and personalized experiences. Virtual reality (VR) and increased reality (AR) Creating immersive encounters in shopping, instruction, gaming, and other fields. Internet of Things (IoT) Connecting IoT applications and gadgets to provide wellbeing observation, keen domestic robotization, and other modern solutions. 5G technology Use the quick and cheap 5G systems to make strides application execution and open modern opportunities. Development of a portable base Whether you select local or cross breed portable app improvement, one of the to begin with obstacles you have to overcome is the restricted assets accessible on portable gadgets. Your versatile gadget has less preparing control and memory than a desktop computer or undertaking server. These confinements can be a enormous challenge, particularly when you are commonplace with the restricted assets of conventional program advancement for web applications. Mobile stage assets are restricted, and you require to adjust them to your app plan goals. In the versatile app advancement prepare, designers must work to guarantee that their versatile apps expend less assets than customary desktop apps. Giving a great client involvement is important. The to begin with thing to get it is that the client interface of the portable app ought to be less complex than the interface of the desktop app. By making a straightforward UX plan that centers on key highlights, you can give a superior client encounter whereas utilizing less resources. Your portable application interface ought to be planned for touch. Portable clients ought to be able to effortlessly explore your app and give input without having to sort as well much. Fortunately, the prerequisites for this pleasant and basic touch application meet the desires of the clients. Versatile clients frequently anticipate errands to be effectively completed with fair a few clicks. They need their apps to be quick, helpful, and simple to utilize on versatile devices. FAQ What is versatile application development? The process of making computer programs for smartphones, tablets, and computerized colleagues, particularly for Android and iOS working frameworks, is called portable app development. Which app is being created in prevalent countries? Android app advancement is a well-known choice among autonomous app advancement companies. Can we utilize applications without the internet? Applications can be utilized and work offline without a web association, making them solid in distinctive situations. What are the benefits of versatile apps? Mobile apps offer comfort, engagement, availability, and efficiency. What are the future patterns in versatile applications? Future patterns incorporate AI and ML, AR and VR, IoT integration, and leveraging 5G technology. Conclusion The computerized world is getting to be more accommodating, available, and engaging much obliged to versatile apps. The conceivable outcomes for smartphone apps appear boundless as innovation creates. Companies and engineers can deliver cutting-edge applications that fulfill client desires by grasping current patterns and evacuating deterrents to improvement.

Send a Snappy Cartoon Face Lens for Instant Laughter

Reaching people today with the fast-paced digitalization of life, social media innovations have surely transformed the face of communication. Among these fantastic features is the Cartoon Face Lens, which is perfect for one to bring their online presence to life with cheers. With this playful feature, transforming selfies into cartoon characters, have fun with post additions.  Another snap that you might want to share the Cartoon Face Lens with your friends and followers who will be overwhelmed with joy, creativity, and laughter. We will explain in detail the cartoon face lens-a how to use it, benefits, and tips for the perfect snap. read more about folmoria Table of Contents What is the Cartoon Face Lens? How to Access the Cartoon Face Lens Features of the Cartoon Face Lens Benefits of Using the Cartoon Face Lens Tips to Take a Great Shot Creative Ideas with Cartoon Face Lens Sharing Your Snap on Social Media Frequently Asked Questions Conclusion 1. What is a cartoon face lens? The Cartoon Face Lens is fun and transforms your face by using augmented reality (AR) technology into a playful cartoon character. It highlights facial features with bright colors, exaggerated expressions, and humorous effects. This lens is available on multiple social media sites, so it can be used in many different applications. Key Points: Augmented Reality Technology: It uses AR to detect and alter facial features. playful effects  It adds amusement to your photograph as it interacts with the viewers. Social media-friendly: It can be seen on social apps, including Snapchat, Instagram, and Facebook. Knowing AR Technology Augmented reality adds elements from the digital to the real world. In the Cartoon Face Lens, the AR technology scans your facial makeup in real time. Next, it places cartoon effects over your face and gives users an interactive, dynamic nature to play with the lens. This aspect of infusing technology along with creativity allows for an entirely novel way to express oneself. 2. How to Access the Cartoon Face Lens With just a few steps, the Cartoon Face Lens is accessible. Access it as follows, one at a time, in the favorite social media app of yours: Open App: Open Snapchat, Instagram, or your favorite social media app. Switch to Camera Mode: Click the camera icon to turn the mode to the camera. Find the Lens: Locate the lens icon; it will, usually, be found on the shutter button. Select Cartoon Face Lens: Browse for it or type in the search in the lens gallery. Turn On the Lens: Tap to enable, and your camera makes your face into something magical . 3. Cartoon Face Lens Features Cartoon Face Lens has several features that enrich your picture taking experience. The following are some of the key attributes of these features: Facial Recognition The lens uses advanced facial recognition technology to perfectly capture your features. This way, the cartoon effects perfectly become in line with your face. It captures subtlety, giving your cartoon image a real and personalized look. Animated Effects Some of the interesting features in Cartoon Face Lens are its animated effects. This may range from: Expressive Eyes: Your eyes might become enlarged or change color. Dynamic Background: Some of them will have the moving backgrounds, bringing depth in. Toy Accessories: Cartoon glasses, hats, or animals will come along with your face. Custom Filter Many variations of Cartoon Face Lens provide filters which are custom. A user has different cartoon styles to choose one based on the personality or mood. This is how creative one can get when personalizing their expression. Background Effects Some also have animated backgrounds. For instance, you may end up having a magical forest or an entertaining city life screen behind your snap since it includes some storyline. Summary of Features 4. Cartoon Face Lens Benefits There are numerous benefits of the Cartoon Face Lens. Here’s a list of its pros: Laughter Over Instantly Sometimes, the funniness of the Cartoon Face Lens causes instant laughter over it. For example, when snaps are sent to friends or posted on social media, sometimes funny effects tend to change the prevailing light mood by creating an atmosphere of enjoyment. Creative Expression The lens allows its users to be creative. Using your normal selfie in color cartoon, you can show distinctive personalities. Your audience is usually more interested with shareable content. Shareable Content Funny and weird shots are high on sharing. People generally re-share or share funny cartoon shots, which eventually leads to increasing views for your profile. That helps the influencers and creators especially.  Ice Breaker This cartoon face lens could become an icebreaker. If a person does not know how to start a conversation, he can send a funny snap that will relieve the atmosphere and provoke laughing. It is just one of the ways to connect with friends or new acquaintances. Summary of Advantages Helps in building relationships: It is a social icebreaker. 5. Photo Tips to Get the Perfect Snap For one to make the most of the Cartoon Face Lens, here are some helpful tips on perfect snaps: Lighting Lighting is essential in any photo. It seems as if natural lighting will always complement the colors and details of your snap. Avoid taking snaps late at night since the abundance of light will be your guiding factor when taking the perfect snap. Try Angles For the snap, there are different angles that will work really great for you. Angle your head forward and backward, get yourself looking up, or have your profile captured. Angles help you to find a perspective that will suit you well and have fun. Humorous Faces The lens laughs with exaggerations. Try posing with a funny pose or making funny faces. The more animated you are the better the result. Props Use props: Make use of a hat, glasses, or toys that match the cartoon theme. It will add another fun play element. Take Multiple Shots You may click several hundred snaps since you love experimenting with different

How to Downloading and Installation a Filmora Video Editor

FILMORA is video editing software designed by Wondershare. It was developed especially to fulfill the needs of all types, starting from the novice video maker to professional editors. Filmora owns extensive designing with robust features and a friendly interface which enables one to make videos on any platform like YouTube, TikTok, or Instagram. This is all-inclusive guide for you to download and install on your computer to begin editing right away. 1. What is Filmora? it happens to be one of the most popular video editing tools available today. The video editing tool encompasses a huge combination of features such as: User-friendly Interface: The layout of Filmora 14 is designed to be easy to use, so even beginners can use it without a significant learning curve, yet there are options to give depth to professionals. Variety of Editing Tools: Using this software, you can trim, cut, merge, and enhance videos with several effect and filter options. Huge Asset Library: it has a very huge library of royalty-free music, sound effects, transitions, and visual effects that are useful for enhancing your projects. Text and Titles: Create engaging text overlays and titles with numerous customizable templates. Screen Recording: it allows users to record their screen directly, making it great for tutorials and gaming videos. Social Media Integration: Easily share your finished projects on popular social media platforms. 2. Check System Requirements Filmora Download Before the download, ensure that your computer can meet the minimum system requirements. Here’s the minimum system requirement for Windows and Mac operating systems: For Windows Operating System: Windows 10 or later CPU: Intel i3 or better RAM: 4 GB minimum (8 GB recommend) Graphics Card: NVIDIA GeForce GTX 700 or AMD Radeon R5 or better Disk Space: The hard disk space must be free for at least 10 GB For Mac Operating System: macOS 10.12 or later Processor: Intel Core i3 or better RAM: Minimum 4 GB (8 GB recommended for best performance) Graphics Card: Intel HD Graphics 5000 or better Disk Space: At least 10 GB of available hard disk space Most of these requirements will ensure high performing smooth editing. 3. Downloading Filmora Download Filmora by simply following the easy steps as listed below Step 1: Access the Official Website To access the Wondershare Filmora official site: filmora.wondershare.com. Download any software from the official websites. Never download any pirated version. Step 2: Select OS You should click either the Windows or Mac option for you to obtain the Filmora download on your homepage, whichever is preferred and suitable for your OS. Step 3: Click Download Following that, click on the “Download” button after you choose the version. The software will automatically begin to download. This might take a few minutes, depending upon your internet connection. Step 4: Locate the Installer Once downloaded, head over to your downloads folder to locate the installer for Filmora. It won’t be hard to find as it is usually named with “Filmora” attached to the version number. 4. Installation of Filmora Once you have downloaded the installer, here are some steps for installing Filmora on your computer: Step 1: Run the Installer Double-click the downloaded installer file to start the installation process. When prompted to approve permission to make changes to your device, be sure to click on “Yes”. Step 2: Accept the Terms and Conditions You will be given the license terms and conditions for Filmora. Read the agreement carefully before moving on. Click “I Agree.” Step 3: Choose Installation Location You will be prompted to select a path for installation. You may either choose to use the default location in the installation folder or select any other location on your hard disk. Click “Install” to start installation. Step 4: Wait for Installation Installation can take just a few minutes. The bar will be filling up as it works, according to the speed of your computer. When finished, you will receive a notice of success. Step 5: Open Filmora When installed, you may click “Launch” to open up Filmora directly or search for the Filmora icon that appears in the desktop or applications folder to open later. 5. Opening Filmora Filmora will give you a free trial where you can test most of the features. However, to fully exploit the power of your film, including the removal of watermarks on exported videos, you will need to purchase a license. Here’s how to activate your copy of Filmora: Step 1: Creating a Wondershare Account You should have an account with Wondershare, in case you are asked to create an account. This will automatically give you some management over the licenses and purchases. Step 2: Purchase a License Proceed to the website of Filmora and scroll through the available subscription plans. There are two options: monthly and yearly, so choose the one best fitted for your needs. After acquiring the license, you will receive your license key via e-mail. Step 3: Insert Your License Key Open Filmora and, in the “Activate” section, enter your license key to unlock the full version of this application. With a license key you get to know all premium feature and tools. 6. Getting Started with Filmora: How-Tos To get the best out of using Filmora, here are some tips you should follow: Explore Tutorials: Filmora has tons of tutorials and other resources available on their website. These range from very simple techniques that help with the edging to super complex effects. Try Everything in the Effect Category: Try out all the different effects and see how they work. Use the transition feature to get a feel for how things can move and flow together. Filmora’s huge library means you can experiment in all sorts of styles and then see what best fits your project. Save Projects Regularly: It pays to remember saving your projects regularly. Filmora has an auto-save, but it is still a good habit to save what you do often. Join the community: Participate in Filmora community forums or social media groups. Interaction

Top Features of Filmora: Video Editing Made Easy

Filmora is one of the best video editing softwares for content creators. The software features several characteristics that make video production easy and possible for an amateur. Be you an amateur or an experienced video editor, it has all it takes. Here are some of the top features that have placed Filmora in the limelight. User-friendly interface: Filmora’s interface is clean and minimal. Any beginner can find his way in using this. Complicated menus do not bother you. Everything is intuitively organized to quickly access. Drag-and-Drop Functionality It drag-and-drop feature makes edits fast and fun. One can easily add files and effects. All he needs to do is drag media into the timeline, then begin editing. The absence of any background in editing makes it suitable for first timers. To direct subcribe Filmora Exhaustive Transitions Filmora comes with hundreds of transition options. Scene changes can happen in the blink of an eye. Using all these transitions, you will raise the flow of your videos to a higher level. Fade-to-black transitions, to intricate zoom transitions-you name it. Stunning Filters and Overlays Gives your videos some additional enhance through filters and overlays. They come in a wide range from Filmora. You can give your videos a fresh feel in just a few clicks. That immediately raises the quality of content. Text and Titles Add stylish text easily to your videos. Rich in title templates are Filmora. You can choose your font, color, and even the style which might go very well with your brand or project. Very suitable for YouTube intro, tutorials, social media content, and more. Music and Sound Effects Under the in-app music library in Filmora, you get to look through royalty-free tracks and access sound effects. You will, therefore, conclude with just the audio for your videos. Additionally, you can change the audio levels inside the timeline. Advanced Editing Filmora does more. You may edit using advanced software with features such as green screen and split screen. Advanced features are usually available in professional software but have been simplified here. Motion Tracking Filmora supports motion tracking. This tracks objects or people inside your clip. You can add text, effects, or even attach images to moving subjects. Its amazing feature for action videos or even product demos. Support For 4K Videos Filmora supports video editing of 4K videos. If you are working at the best quality, Filmora has no trouble with that. The final products will seem crisp and professional on any screen. Export Options Share your creativity easily with Filmora. With this, you can export your videos in various formats, or even send them directly to social media. It supports most sites like YouTube, Vimeo, and more. This will make it easier for content creators to publish. 10 Reasons Why Filmora Is Ideal for Both Novice and Pro Editors This product bridges that gap between simple and advanced editing. Here are ten reasons why it’s perfect for new and seasoned video editors. 1. Learning Curve and Friendly Filmora is easy to learn. There are guided tutorials that make learning fun. Start creating immediately, and it gets effortless once you know how. 2. Low Price Filmora is much less expensive than the other software. You get professional tools without paying an arm for them. This makes it accessible for hobbyists and small business owners. 3. Constantly Updated Wondershare updates Filmora regularly. It rolls out new features and resolves any problem that may be prevailing. This way, you are always in touch with the newest editing tools. 4. All-in-One Solution Filmora includes everything you need. You do not have to install a lot of plugins or applications. From video trimming to effects addition, it is all included within this package. 5. Community and Support Filmora has a lively online community. It has tutorials, forums, and posts from fellow users. And just in case you’ve encountered some issues, their customer support is always readily available. 6. Cross-Platform Compatibility Filmora is Mac and Windows compatible. This software offers a smooth experience from one device to another. This is helpful for those editors who are often transferring among operating systems. 7. Effective Workflow Filmora can save you a lot of time while editing. You can work on a drag-and-drop interface, saving time, in short, you spend less time learning and way more time creating. 8. For Social Media Influencers Filmora is one of the best for social media influencers. The software provides you with in-built templates for YouTube, Instagram, and TikTok. This saves you the trouble of making interesting content while sparing as much effort as possible. 9. Advanced Features for Professionals Even though very simple, Filmora doesn’t shy away from including intricate editing functions. For professionals, there is color correction, keyframing, and audio equalizers. These features provide users with even more power in the final product. 10. There’s a Trial Version Available You get to try it out before buying it. The free version unlocks most of its features. This is great because users get to try it out without any financial investment. Conclusion Filmora creates an absolute balance of beginner-friendliness and being a feature-rich movie-making tool. This intuitive interface coupled with the impressive tools does make it suitable for every level, be it just an amateur or a professional who runs and manages a business where video content forms the heart. Whether creating videos for YouTube, business, or other personal use, Filmora simplifies things for you. It’s affordable, easy to learn, and packed with so many useful features that really enhance your video project. FAQ 1. What is Filmora? Filmora is the video editing software by Wondershare, and the features are available to both newcomers and experts alike. 2. Is Filmora free? It is free, but you can have a free trial of the system. The full range of your tools will only be accessible if you pay for the subscription. 3. Can I use Filmora on Mac and Windows? Yes, Filmora works great on Mac and Windows operating systems. Seamless

How to Use DISM for System Maintenance: A Step-by-Step Guide

Deployment Imaging Service and Management Tool, shortly referred to as DISM, is one of the most vital command line utilities in Windows. Basically, this utility is for maintaining and repairing Windows images; hence, it’s very important for users that want their system not to lag or get corrupted. This article will cover an all-inclusive overview of DISM functionalities and guide the user step-by-step on how to use it for system maintenance. The latest update to Wondershare Filmora elevates your video content What is DISM? DISM stands for Deployment Imaging Service and Management Tool. It is also a pre-installed Windows tool, managing and servicing Windows images-on an online image-that’s the operating system you have running now-and on an offline image-Windows images stored on your hard drive or installation media. It plays a very key role in how your system retains integrity and runs well. Key Functionality of DISM System File Repair: It is capable of repairing corrupt or missing system files. Management of Windows Images: It allows updates, drivers and language packs. Improving System Performance: Through the repair of issues in the system, DISM makes the system perform better. Preparing Windows for Deployment: It is deployed in enterprise environments preparing images of windows for deployment. Why Do You Need DISM? The use of DISM is the only way by which your Windows system would maintain healthy functioning. Here are really good reasons to use DISM: Repair of Corruption: Files can be corrupted from time to time due to factors such as software installations, power outages, or hardware failures. In such instances, corrupted files are found and repaired by using DISM so that your system does not get unstable. Better Performance: A healthy system runs more efficiently. Using DISM will even fix problems in your PC and thus bring it to you better performance and responsiveness. Easy Troubleshooting: A nice and efficient tool for troubleshooting when you face a problem with Windows. DISM can usually troubleshoot many common issues, saving you so much time and effort. Periodic Maintenance: Like any machine, your computer also has maintenance. The DISM should be run periodically to prevent future issues or even maintain your system at the best condition. The latest update to Wondershare Filmora elevates your video content When To Run DISM? Run DISM when:Crashes regularly: If your system crashes spontaneously, it may be an indication of deeper issues which DISM could resolve. Windows Update Failures: If at any instance it experiences some problems when one attempts to upgrade the Windows, then running DISM is said to solve issues that prevent an update from finishing. Application Errors: If applications fail to open or freeze regularly, the DISM can resolve file corruption that is the cause of problems. System Performance: if your computer is slow or freezes usually, you will have an access point to DISM in order to identify and repair issues associated with slow system performance . How to Access DISM In using DISM, you have to first of all open Command Prompt with administrator permission. Here is how to do it. Step 1: Open Command Prompt Click on the Start Menu: Find the Windows icon on your taskbar. Search for Command Prompt: Type “cmd” in the search bar. Run as Administrator: Right-click on Command Prompt and select “Run as administrator.” Thus, you can run these commands according to your privileges or permission. Basic DISM Commands To get started with the following step-by-step process, we need to know the basic DISM commands. Here are the most frequent ones: DISM /Online /Cleanup-Image /CheckHealth This command scans for corruption within the Windows image, giving you a quick view on the health of that image. DISM /Online /Cleanup-Image /ScanHealth This command takes a little longer but provides a detailed scan of the image, as it looks for component store corruption. This command has to do with restoring your system’s health. DISM /Online /Cleanup-Image /RestoreHealth This command will self-repair the Windows image upon detecting corruption. It is the most used command in the solutions. How to Use DISM – Step by Step Now that you know what DISM is and what the commands do, walk through how to use DISM for system maintenance. Please follow these steps closely. Step 1: Open Command Prompt as an Administrator As discussed above, you are required to start the Command Prompt under administrative; otherwise, you will fail to run the DISM command. Step 2: Check System Health Start by checking system health by issuing the command copy code DISM /Online /Cleanup-Image /CheckHealth Press Enter. This will scan your Windows image quickly for problems. You’ll get a message stating whether your image is healthy or if there are known issues. Step 3: Check for Corruption If you see potential problems, then the next step is to check in more depth for corruption with the following command: DISM /Online /Cleanup-Image /ScanHealth Press Enter. This command takes a little time, be patient. DISM will check your system for system component store corruption. Step 4: Restore Health of Your System If corruption has been detected during the scan, you will have to restore the health of your system by following the line using this code: DISM /Online /Cleanup-Image /RestoreHealth Press Enter. This will start the repair process. It will take some time. Do not interrupt this process. Once the DISM repair process is complete, you can see a success message or details of any other issues. Step 5: Checking the Results Now you will view a summary of the process after it is complete. When you run DISM, if this tool detected and repairs some problems, you will discover a successful message. When some files could not be repaired, execute the instructions on what to do further. Step 6: Reboot Your System When your system runs DISM, reboot your system. It is essential to do so because all the repairs are meant to take proper effect in your system and get your system running optimally. More Tips in Using DISM If you want to squeeze

Xbox Series Z: The Future of Gaming is Here

The gaming world is quite the buzz over this so-called Xbox Series Z. Microsoft happens to be the kind of company that always pays for attention; sure enough, however, the Xbox Series Z will be no different. With upgraded hardware, mind-blowing graphics, and a flawless gaming experience, this next generation may redefine the whole playing experience.  Whether you are an occasional game player or an absolute enthusiast, Xbox Series Z promises something in store for everyone. Let’s take a deep dive into what makes this console so exciting. From performance improvements to game libraries, we’ll explore all the potential features and benefits of upgrading to the Xbox Series Z. Direct subcribe 1. Unmatched Performance Any game console performance always acts as one of the main selling points. The Xbox Series Z is likely to host unparalleled power and speed. What the Xbox Series X did by breaking the ceiling for gaming, the console is most likely to top off from. Upgraded Processor The Xbox Series Z will reportedly come with a custom AMD processor-which, for sure, really goes to pump up the speed of processing. Meaning, this will probably be a better gaming experience and faster loading times.  Imagine jumping right into your game without waiting minutes for it to load. The new CPU is also going to be better at running multiple processes at once. This is particularly relevant where you will be switching between games, applications, and media seamlessly without slowing down the system High-Level Graphics The graphics is where the Xbox Series Z would be exceptionally special: 8K resolution and ray tracing take visuals to a whole new level. Ray tracing adds more realistic lighting, shadows, and reflections into your game.  Think of reflecting water ripples that look like real water in games; think about how shadow would be completely natural in the way it’s cast with regard to the light source. This offers an experience that is true-to-life. Quicker SSD Indeed, just like the Xbox Series X will use a lightning-fast SSD. It is going to introduce far-faster-than-ever load times and allow the player to dive into their games practically instantly. Indeed, this will also help open-world games where environments don’t lag opening. Result? Even much smoother and seamless gaming experience. 2. Immersive 8K Gaming One of the biggest upgrades that will be seen in Xbox Series Z would be 8K gaming capability. Of course, 4K gaming itself is quite impressive, but picture clarity at an 8K level is at a whole new high. The more pixels on the screen, the more details appear sharp, with graphics looking vivacious. Ray Tracing for Realism With ray tracing, the light in your game is going to behave just as it would in the real world. This would mean that your reflections and shadows react correctly to your game environment. Whether you explore a dark cave or walk through a city bathed with the warmth of the sun, the level of realism is going to be breathtaking. High-Dynamic-Range Technology The console will also likely feature HDR (High Dynamic Range). HDR improves color accuracy, making colors look more vivid and lifelike. This is especially noticeable in games with lush environments or intricate details. Whether you’re playing a colorful platformer or a gritty action game, HDR will make the visuals pop. 3. Extensive Game Library with back-compatibility Xbox Series Z: Such an extensive library will let the player enjoy new and old games once he decides to do so. That way, Microsoft will boast of its very solid history of supporting backward compatibility with its successive versions, which is also in store for series Z. Backward Compatibility Backward compatibility will preserve your favorite Xbox One or Series X games if you shift to a newer generation. You can play titles from older generations without having to repurchase them, all of which is a massive edge for gamers looking to maintain their existing library while buying new hardware. Game Pass Integration The Xbox Series Z should probably be tied into Microsoft’s subscription service, Xbox Game Pass, which is already popular. Game Pass was popular with hundreds of games for a monthly fee. Day-one releases for the service included first-party titles from Microsoft. The Series Z could make more titles optimized for the new hardware, with an amazing value proposition for gamers. New Exclusives The mastership of Microsoft in game exclusives for its consoles has been proven once again; Xbox Series Z, needless to say, would bear no difference whatsoever ,not even an iota—bringing brand-new titles alongside some returning favorites like Halo and Forza, optimized to take advantage of the power of the Series Z. 4. Cloud Gaming Features Cloud gaming seems to represent one of the core components of Xbox Series Z, for the company’s xCloud platform will not only enable game streaming but also directly stream games to a console or other devices. This means that gamers do not need to download games all the time, which would be very handy for those gamers with limited storage space or slow internet speeds. Seamless Streaming With cloud gaming, access to play games is there almost immediately as opposed to the usual download and installation process. For the Xbox Series Z, cloud gaming would be quite seamless – that is, less latency and better performance. Streamability will also cut across other platforms such as smart phones and tablets. Accessibility The Internet now makes it accessible for players to access any game in a library from anywhere. With internet, you get the freedom to play your favorite games anywhere, and this is what makes the Xbox Series Z flexible and convenient for the gamer of today. 5. Amazing User Experience The Xbox Series Z is designed to introduce new features along with powerful hardware into the user’s gaming experience. User Interface Improvements It would feature a sleek, modern interface on Xbox Series Z highly intuitive and easy to navigate. Dash board should enable the ease for players to get at games, apps, and

How to Use DISM Command: dism /online /cleanup-image /restorehealth to Repair Windows System Image

Deployment Imaging Service and Management Tool, or DISM as it is short is a very powerful tool that has been released by Microsoft with all its functions to service, repair, and manage Windows operating systems. Although Windows is one of the most reliable and robust platforms, its users might sometimes come across some adverse conditions; for example, system file corruption and failed updates, or maybe application crashes. If you hit the problem discussed above, you may not have to restore the whole operating system. The DISM tool will most of the time be self-sufficient enough to deal with any underlying problems because it is capable of repairing the Windows system image, which is simply the core set of files on top of which the whole operating system relies. In this guide we’ll go into depth about how to use the command line dism /online /cleanup-image /restorehealth when to use it, and how it can be useful for cleaning a corrupted Windows installation. In today’s post, I will explain everything, from the most basic to the advanced scenarios, so you know exactly how to get the most out of using DISM . dism /online /cleanup-image /restorehealth to Repair Windows System Image What Is DISM? DISM (Deployment Imaging Service and Management Tool) is a Windows command-line tool available in Windows 7, 8, 10, and 11. Though the tool was designed for deploying Windows images it also offers comprehensive functionality to maintain and repair the Windows system; it can service images either online-on a currently running system-and offline-on an image that isn’t running at this time. DISM is capable of performing a variety of tasks, including: It is particularly helpful when your system has crashed because of corrupted or missing system files, or because Windows Update fails. DISM differs from the System File Checker (SFC), which scans one-off files, whereas DISM finds issues with the Windows component store, a critical module of any OS. How Does the DISM dism /online /cleanup-image /restorehealth Command Work? Probably the most commonly used of the DISM commands is “dism /online /cleanup-image /restorehealth.” This command scans and then fixes the image of the Windows operating system. It is very effective when there becomes a corruption in the system files, which prevents windows from operating normally. Breaking Down the Command: That means basically you are asking Windows to scan for any corrupted parts in the system image and to fix them so DISM is one of the handiest tools for maintaining your system stable and reliable. When to Use DISM? The DISM command can diagnose a whole range of issues, so it’s extremely useful if you are trying to troubleshoot a corrupted Windows installation. These are some of the more common scenarios in which you might find it useful to run DISM: 1. Windows Update Failure If Windows Update fails with repeated failure, or you get errors such as 0x800f081f or 0x80073712, these can be symptoms of corruption within the Windows image. Running DISM will detect and correct any corruption which is stopping updates from completing itself. 2. Corrupted System Files System files corrupted either due to bugs in the software, sudden shutdowns, or even malware over time bring about random crashes, blue screens, and other different issues related to system instability. DISM fixes these problems by turning the system back into a healthy state. 3. Application Errors Applications may not work properly because of problems with Windows system files. Applications are crashing or misbehaving, use DISM to restore necessary system components so those applications work again. 4. General Slowness of System A slow system often represents a buildup of errors and corrupted files in the Windows image. DISM cleans up these corruptions and gets your system running smoother and faster. How to Run the DISM Command: Tutorial It is pretty easy to run the DISM command, but it does require administrator access to run. This is how you can run the dism /online /cleanup-image /restorehealth command on the computer you are currently using: Step 1: Open Command Prompt as Administrator You should first open the Command Prompt with administrator permissions. It’s located at  Step 2: Enter the Command Open the Command Prompt window and input the following command. Click on Enter to continue. /dism /online /cleanup-image /restorehealth Step 3: Wait for the process to run its course The scan and fix process takes anywhere between 10 minutes and more than an hour, depending on the performance of your system and whether it needs to download files from Windows Update. You will be updated percentage by percentage in the window of the Command Prompt and do not try to intervene as it will complete all by itself. Step 4: Restart Your Computer Once the process is complete, it needs to be rebooted for the fixes to be in effect completely. Optional: Running System File Checker (SFC) Once the DISM repair is over, you can have the System File Checker run to verify that all of your system files are intact. To do so, you can enter the following command in Command Prompt: sfc /scannow The SFC tool checks your system for any remaining residual file corruption and heals it automatically. More Advanced DISM Commands While dism /online /cleanup-image /restorehealth is arguably the most commonly used command on its own to repair a running installation of Windows, DISM has further commands and options to fulfill even the most advanced use cases. Repairing with a Local Source Depending on the networks or corrupted components of Windows Update, the DISM might not manage to download the repair files it needs. In this regard, you can provide a local source with it, such as the installation DVD/ISO. Here’s how to do it: Mount the Windows Image: Copy codedism /mount-image /imagefile:C:\images\myimage.wim /index:1 /mountdir:C:\moun Run the Cleanup and Repair Commands on the Mounted Image: Copy codedism /image:C:\mount /cleanup-image /restorehealth Unmount the Image and Commit Changes:dism /unmount-image /mountdir:C:\mount /commit This method allows IT administrators to repair Windows images before deployment, ensuring the images are clean